DIY Arduino Based Air Sensor (pt. 1)
This blog is part 1 of a series of projects where we'll be building an air sensor on the arduino platform. In part 1, we'll wire up a PMS5003 to an ESP32 microcontroller, and write out Arduino code to retrieve sensor values from the PMS5003 and log them to console.
hardware
- esp32/esp8266/arduino microcontroller
- pms5003 sensor
- breadboard
- jumper wires
software
- arduino ide
- Adafruit PM25AQI library
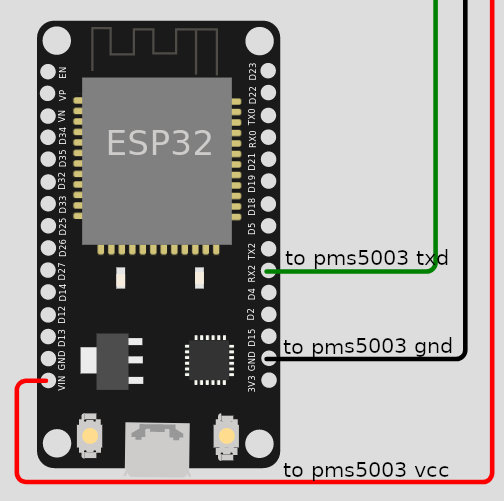
1. let's get connected
Connect the microcontroller ESP32 to PMS5003 sensor like this. Note that microcontroller's RX should be connected to the sensor's TX.
2. code it out
This code example is the bare minimum you will need to get up and running reading sensor values from the PMS5003.
You will need to have the Adafruit PM25AQI library installed - this library can be found in the Arduino Library manager if you search for "Adafruit PM25 AQI Sensor".
#include "Adafruit_PM25AQI.h"

Adafruit_PM25AQI sensor = Adafruit_PM25AQI();

void setup() {
  // Print values to serial monitor at a baud rate of 115200
  Serial.begin(115200);

  // Since the sensor is connected to the RX2 pin, we will use Serial2 to read the values.
  Serial2.begin(9600);
  sensor.begin_UART(&Serial2)
}

void loop() {
  PM25_AQI_Data data;
  // Print PM2.5 value to serial monitor every second.
  if (sensor.read(&data)) {
    Serial.print("PM2.5: ");
    Serial.print(data.pm25_standard);
    Serial.print("\n");
  }
  delay(1000)
}
3. upload the code and open serial monitor
With the code running on the microcontroller, pull up the serial monitor at a baud rate of 115200 and observe the values. It should look something like:
PM2.5: 20
PM2.5: 20
PM2.5: 20
...
4. next steps
In part 2, we'll build on this tutorial by optimizing the code to prolong the life of the pms5003 sensor. In particular, we will implement functonality to take a reading every 15 minutes and hibernate the sensor until it is ready to take a new reading. Stay tuned!